Quick Summary
Starting a digital manufacturing business—whether with a laser, CNC, or UV printer—is both exciting and overwhelming. Between equipment choices, legal paperwork, banking, pricing, and marketing, there’s a lot to get right. This guide walks you through each step of the journey, combining practical frameworks with real-world stories. By the end, you’ll know how to avoid common pitfalls, make smarter decisions, and build a business that truly works for you.
📑 Table of Contents
- Introduction: Setting the Stage
- Choosing Your Type of Business
- Forming Your Business Entity
- Banking & Finance
- Buying Equipment & Setting Up Your Workspace
- Building Your Online Presence
- Payments & Paid Services
- Shipping & Logistics
- Sourcing Raw Materials
- Building Sample Products
- Pricing Your Products
- Marketing Your Products
- Helpful Business Tools
- Insurance Considerations
- Scaling Your Business
- Pulling It All Together (Conclusion)
Disclaimer
1) Introduction: Setting the Stage
If you’re looking for a quick overview you can follow step-by-step, check out our Ultimate Small Business Startup Checklist (Free Printable PDF)
Treat this like a business from day one. Some parts are a blast (designing, making, packaging). Others are less glamorous (bookkeeping, compliance, shipping labels at 11 pm). All of it is work—and that’s okay. If you want your shop to grow, you’ll need consistency more than you need inspiration.
Set a schedule and keep it. Time-block making, admin, and marketing. Protect deep-work blocks (design and production) like customer appointments. You’ll move faster with a simple operating rhythm than with bursts of all-nighters followed by burnout.
Decide your first 90-day focus. New equipment, a collection launch, or reaching your first 50 customers—pick one concrete outcome and reverse-engineer your weeks to make it happen.
Mini-Checklist:
- Design your ideal week with fixed blocks for production, admin, and marketing.
- Set a 90-day target (one outcome) and break it into weekly milestones.
- Choose a simple habit tracker (calendar, paper checklist, or app).
- Define “done” for each day before you start (e.g., 2 product listings, 1 hour design, reconcile transactions).
- Keep a weekly review: what worked, what didn’t, and one improvement to ship next week.
2) Choosing Your Type of Business

Start by deciding how broad or focused your business will be. Some makers go wide—laser + CNC + UV—while others start with a single discipline and master it. Neither is “right.” The best choice depends on your goals, space, budget, and timeline.
Not to mention: equipment isn’t cheap, and revenue may be slow at first. Narrowing your focus early can keep costs down and help you learn faster. You can always expand later. That’s not to discourage you—it’s to help you pick the path that fits how you want to work your business.
Option 1: A Focused Business (One Discipline)
Benefits
- Lower startup costs—one main machine + accessories.
- Easier learning curve; fewer workflows to master.
- Optimized setup often means faster cycles. Time = money.
- Specialization can command higher prices.
Trade-Offs
- Limited material range/product diversity.
- May need to buy blanks or pre-prepped materials tailored to your machine.
- Downtime risk if the one machine fails.
Option 2: A Broad Business (Multiple Disciplines)
Benefits
- Flexibility to create a wide range of products in-house.
- Less outsourcing long-term; more control over quality and lead times.
- Diversification spreads risk if a product category slows.
- Attractive to B2B/wholesale buyers who want one vendor.
Trade-Offs
- Higher upfront costs (machines, tools, accessories, support gear).
- Steeper learning curve; multiple software stacks and maintenance routines.
- Workflow complexity—juggling processes can stretch your time thin.
📌 A Real Example
I chose the broader route: a Sienci LongMill MK2 4×4 CNC, a Monport Effi9s 90W CO₂ laser, and a UV printer. The downside: significant upfront capital and a learning curve that more than tripled. The upside: I can do most things in-house, save money over time, and pivot quickly. There are larger/faster machines out there, but this setup fits my path and products. See my work at Carved & Cut Creations (carvedcutcreations.com).
Mini-Checklist:
- Choose focused (one discipline) or broad (multi-discipline).
- Match your choice to your space, budget, and learning capacity.
- Sketch your first product line and confirm your chosen machine can make it.
- Plan a path to expand later (accessories, second machine, or new discipline).
3) Forming Your Business Entity
You can DIY your formation or use a formation service. Doing it yourself is usually straightforward and cheaper, but it takes a little learning. Formation services can be convenient—especially if paperwork makes you nervous—but read the fine print.
Many services advertise “free company setup.” Typically, the “free” part covers the basic filing, while they make money on add-ons (registered agent, EIN, compliance filings, operating agreement). Those can be helpful—just know exactly what you’re buying.
Larger customers sometimes treat single-member LLCs differently from multi-member LLCs or corporations when setting up vendor accounts. Be ready to explain your structure.
DIY vs Service: Benefits vs Trade-Offs
DIY Formation
Benefits: Lower cost; total control; you’ll learn the requirements and deadlines.
Trade-Offs: Time/effort; risk of errors if you rush; you must track ongoing compliance.
Using a Formation Service
Benefits: Convenience; reassurance; often includes reminders/registered agent.
Trade-Offs: More expensive with recurring add-ons; risk of dependency; may sell you things you don’t need.
📌 A Real Example
I chose the DIY method because I like to know what’s under the hood. It’s my business; I want to own the deadlines and paperwork. In the past, I’ve switched providers and discovered I didn’t actually know what they were handling—so DIY gives me clarity and peace of mind.
Important: This was right for me. If outsourcing the “official upkeep” helps you move faster and sleep better, that’s valid. Different paths, same destination.
Mini-Checklist:
- Decide entity type (LLC, sole prop, corporation) for liability/tax needs.
- Register at federal/state levels; get an EIN and any sales tax permits.
- If using a service, list every add-on and annual fee in writing.
- Draft a simple operating agreement; keep ownership records tidy.
💡 Pro Tip: If you use a service, download all docs to your own files. Don’t let your legal paperwork live solely behind someone else’s login.
📌 Note: I’m planning a separate deep dive comparing formation services—their packages, recurring fees, and where each one stands out.
Bottom line: You can form your business without a service. If paying for guidance helps you move faster, price that ongoing cost into your budget.
4) Banking & Finance

Separate business banking is non-negotiable. It protects your liability shield, simplifies taxes, and looks professional. Open checking, savings, and a business credit card right after formation. Never mix personal and business money.
Banks and processors love small print. Watch for monthly maintenance fees, minimum balances, “analysis” fees, transaction limits, cash deposit fees, ACH origination fees, wires, paper statements, PCI/“compliance” charges.
Bookkeeping doesn’t have to be complicated. Pick one accounting tool, connect your bank and payment processor so transactions import automatically, and reconcile weekly.
📌 A Real Example
My sales are online and in-person (shows), so easy cash deposits mattered. I opened a business checking account at a local credit union—no restrictive cash deposit limits and solid branch service.
For digital features, American Express Business Checking adds interest on balances and unlimited ACH transfers, which helps when card volume spikes—no “gotcha” transfer fees.
I researched Chase and Bank of America for checking: Chase had too many fees for my needs; BofA’s local branch reviews were mixed (and I spent 30 minutes on hold with no answer). Not a fit.
Where Chase did shine: business credit cards—strong signup bonus + 12 months interest-free. That let me finance equipment while keeping cash in my Amex account earning interest.
For processing, I chose Square as my primary to handle both online and in-person under one umbrella. I still recommend mixing platforms when needed: Stripe excels online (custom checkouts), while Square is great in person (more hardware options; you can even start with just your phone).
Questions to Ask (Banks)
- What exactly triggers the monthly fee waiver? Get it in writing.
- How do you count transactions—do ACH/mobile deposits count?
- ACH origination fees and limits? Prefer $0–$0.25 with reasonable caps.
- Cash deposit fees? Low per-$1,000 or a set number of free deposits.
- Any hidden “analysis” or paper statement fees?
Questions to Ask (Processors)
- Interchange-plus or flat pricing? Send the full schedule.
- List every monthly fee (PCI, gateway, statement, minimums).
- Daily batch/settlement fees? Ideally $0–$0.10.
- Chargeback/retrieval fees? $15–$25 is typical.
- Contract terms & early termination? Month-to-month, no ETF preferred.
- Payout timing & reserves? 1–2 business days, policy in writing.
- Can I use my own hardware? Avoid leases—buy outright.
Red Flags
- Tiered pricing with no interchange transparency.
- Multi-year contracts with early termination.
- “Free terminal” that’s actually a lease.
- PCI non-compliance fees with no help completing the SAQ.
- Monthly minimum that doesn’t match your volume.
- Banks requiring high daily balances just to waive small fees.
Credit Card Perks & Pitfalls
- Perks: Signup bonuses, 0% APR promos, rewards/cash back can meaningfully offset costs.
- Pitfalls: Overspending to hit bonuses; post-promo APR (often 20%+); carrying a balance erases rewards.
Bottom line: Use cards as a cash-flow tool, not a crutch. Always plan to pay before interest kicks in.
Mini-Checklist:
- Bring EIN and formation docs when opening accounts.
- Open business checking/savings + a business credit card (expect a personal credit check/guarantee).
- Connect bookkeeping; reconcile weekly.
- Document all bank/processor fees and renegotiate or switch if needed.
- Set aside tax money monthly.
💡 Pro Tip: If your bank won’t waive nuisance fees or be transparent, switch. It’s easier early than later.
📌 Note: I’m building a head-to-head comparison of banks, credit unions, and online accounts for different business models.
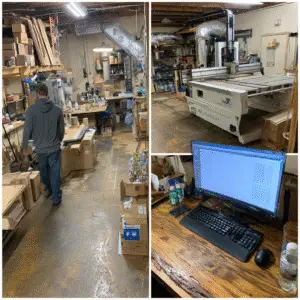
5) Buying Equipment & Setting Up Your Workspace

Plan your space before you buy. Machines are big, heavy, and loud. Map material flow, ventilation, dust collection, fire safety, and storage. Measure doors and hallways.
Power matters. Check amperage and outlet types. Many machines need dedicated circuits. Don’t force a high-draw tool onto a shared circuit—tripped breakers cost time (and orders).
Buy what you can grow into. Hobby tools are great to learn, but if you plan to sell regularly, pro-grade machines pay for themselves in speed and reliability.
📌 A Real Example
I run a Sienci LongMill MK2 4×4 CNC, a Monport Effi9s 90W CO₂ laser, and a Eufy UV printer. The CNC needs over 4 feet in every direction and is extremely heavy once assembled. My garage wasn’t ideal, but it could support the weight and footprint.
Power was a second surprise. Each unit draws a lot when paired with support equipment (exhaust fan, dust collector, computer). I hired an electrician to add outlets and dedicated breakers—extra cost, but essential.
And the machine is just the beginning. Each requires supporting tools:
- CNC: router, computer, control/design software. I chose VCarve Pro (one-time purchase), an automatic touch probe, and a variety of bits. I prototype with lower-cost Amazon bits, then switch to premium bits (e.g., BitsBits) for production.
- Dust collection: mandatory—CNCs generate huge debris. A Harbor Freight unit has worked well for me at a fraction of the price. (I use: Bauer 35 gal. dust collector)
- Laser: plan for an exhaust fan and water chiller to protect a CO₂ tube. My unit included both; many don’t.
- Laser software: LightBurn—popular, affordable, tons of training. A camera is extremely helpful for alignment; add one if yours didn’t include it.
- UV printer: ink usage during testing is real. Budget for proofs, misprints, and learning.
You’ll also accumulate materials and blanks while experimenting. Buy small at first; once a product proves itself, stock up (ideally on sale) and make space to store it.
⚠️ Overlooked Costs (Don’t Miss These)
- Electrical work (outlets, breakers, circuits).
- Support gear (dust collectors, exhaust, chillers, compressors).
- Software (LightBurn, VCarve, etc.).
- Consumables (bits, blades, lenses, filters, ink, blanks).
- Upgrades (cameras, probes).
- Storage/organization.
👉 Budget at least 20–40% of your machine’s price for setup and supporting equipment.
Mini-Checklist:
- Measure footprint and service clearances; check doorways.
- Confirm electrical needs; hire a licensed electrician if required.
- List supporting equipment/software for each machine.
- Budget for consumables and early misprints/mistakes.
- Plan storage; don’t overbuy without space.
💡 Pro Tip: Tape your floor at 1:1 scale with painter’s tape to test workflow before you commit.
6) Building Your Online Presence
Don’t wait for equipment to arrive—websites take longer than you think. Even if you sell mostly in person, people will Google you. A site makes you credible and gives buyers a place to act.
Choose a platform you can stick with: WordPress + WooCommerce, Shopify, or Squarespace. Marketplaces like Etsy and Amazon Handmade bring built-in traffic but have rules and fees. A healthy mix often works best: own your site and use marketplaces for reach.
Domains are often free for the first year with your host/platform; you don’t have to buy a domain separately.
You can also hire help. Freelance web designers or platform specialists (Fiverr/Upwork) can build quickly with current patterns. The trade-off: you still need to learn how your site works, and you may need help again when you change payment processors or add features.
📌 A Real Example
I kept things simple at first. My primary website is the hub, with social and marketplace presences for reach. I’ve used various builders:
- Shopify is smooth but fees add up.
- WordPress/WooCommerce is flexible but needs more setup.
- Squarespace bundles domain/hosting but is less customizable for complex catalogs.
Right now I’m refining my site, then I’ll launch a select-product Etsy shop. Etsy’s fees mean prices will be slightly higher there; my website avoids those costs so I can pass savings to customers. Etsy builds visibility; my site builds loyalty and margins.
💌 Why Your Email List Is Gold
Algorithms change overnight. Your email list is yours. Start day one—even pre-launch. Offer a signup, a small guide, or early access. Use email for drops, seasonal sales, and stories. No algorithm decides who sees it.
⚠️ Overlooked Costs (Don’t Miss These)
- Domain renewals ($12–$20/yr after year one).
- Premium themes/plugins; SEO tools ($50–$200/yr).
- Email platforms (free tiers grow into paid plans).
- Freelancers/designers ($200–$2,000+ by scope).
- Stock photos/graphics (Canva Pro, Adobe Stock).
- Apps/integrations (shipping, loyalty, analytics).
⚖️ Benefits vs Drawbacks of Online Selling Models
Own Website
Benefits: Full control of brand/data/margins; long-term lower costs.
Drawbacks: You must drive traffic; more setup/learning.
Marketplaces (Etsy, etc.)
Benefits: Built-in traffic, trust, fast setup.
Drawbacks: Higher fees, limited branding/control, rule changes.
Hybrid (Website + Marketplace)
Benefits: Reach + control; marketplaces discover, your site retains.
Drawbacks: Two platforms to manage and price balance.
Mini-Checklist:
- Register a domain (often free year one).
- Publish a simple site or landing page now; refine later.
- Decide additional channels (Etsy, craft fairs, etc.).
- Secure social handles; keep branding consistent.
- Start collecting emails immediately.
- If outsourcing, hire a platform specialist and learn your dashboard.
💡 Pro Tip: Your website + email list are the only channels you truly own.
📌 Note: I’ll publish a deeper guide comparing website builders, email platforms, and Etsy vs. own-store strategies.
7) Payments & Paid Services
Make it easy to pay you. Cash-only leaves money on the table. For online sales, connect a processor (Stripe, PayPal, Square). For in-person, use a reader (Square, Zettle, Clover). Check fees carefully—keyed entries often cost more.
Some site builders bundle payments at higher rates. Always read the fee schedule and understand payout timing and reserve policies.
📌 A Real Example
I chose Square as my primary processor to handle both online payments and in-person at events. Stripe is fantastic for customizable online checkout; Square shines for in-person with flexible hardware (even just a phone). I prefer one umbrella, but there’s no rule against mixing—use what fits your sales mix.
⚠️ Common Traps
- Fund holds on large/unusual orders; know timelines.
- Higher fees for keyed transactions; use the reader.
- “Free hardware” that’s actually a lease.
- Hidden PCI, gateway, or statement fees.
- Chargeback fees even when you win.
⚠️ Overlooked Costs (Don’t Miss These)
- Chargebacks ($15–$25 each).
- PCI fees if you don’t complete the SAQ.
- Hardware costs (readers, stands, printers).
- Cross-border surcharges.
- Extra platform fees if you don’t use their processor.
- Payout delays—not a fee, but a real cash-flow cost.
💸 Price With Fees in Mind
Processing fees (e.g., 2.9% + $0.30) add up quickly. Bake fees into pricing or they’ll eat your margins (see Section 11 for full pricing strategy).
Mini-Checklist:
- Offer cards + at least two wallets (Apple/Google Pay).
- Use a reader to avoid keyed rates.
- Get full fee schedules in writing.
- Confirm payout timelines and reserve policies.
- Consider a hybrid processor setup if it fits your channels.
💡 Pro Tip: Familiar, convenient payment options boost checkout completion.
📌 Note: I’ll publish a detailed comparison of Stripe, Square, and PayPal—fees, chargebacks, and best fits by model.
8) Shipping & Logistics

Shipping can make or break margins. Think protection and presentation: sturdy boxes, bubble wrap, and a small unboxing touch. Open business accounts with USPS/UPS/FedEx; consider tools like Pirate Ship for discounted labels without volume minimums.
Set expectations clearly. If processing takes 5 business days plus 3–5 for shipping, say so. Choose a pricing strategy—“free” (built into price), flat-rate, or live rates—and test how it affects conversions.
📌 A Real Example
Shipping has been one of my tougher challenges. Rates vary by carrier and destination—UPS might win one region and be pricey in another. I use Flexible Shipping by Octolize to build rules (by weight, cart total, category). It’s not perfect, but it keeps things predictable.
My philosophy: break even on shipping. I don’t try to profit on it, but I don’t want it draining my margins. Sometimes I undercharge on one order; the goal is to cover shipping across all orders and protect profitability through product pricing.
⚠️ Overlooked Costs (Don’t Miss These)
- Dimensional weight (large, light boxes cost more).
- Packing materials (boxes, bubble, tape, labels, inserts).
- Return shipping (if you accept returns).
- Rural/fuel surcharges.
- Software costs (Octolize, ShipStation, Pirate Ship Pro).
⚖️ Benefits vs Drawbacks of Shipping Strategies
Flat-Rate — simple/predictable; may over/undercharge on extremes.
“Free” (built-in) — customers love it; requires raising product prices.
Live/Calculated — most accurate; sticker shock can hurt conversion; needs setup.
👉 Many shops use a hybrid: flat or “free” for standard items, live rates for oversized/odd products.
Mini-Checklist:
- Protective packaging + a small unboxing touch.
- Create carrier accounts; compare USPS/UPS/FedEx.
- Test at least one shipping app.
- Pick a pricing strategy; show delivery times clearly.
- Write a simple damage/returns process.
- Run a fully packed test shipment to validate costs.
💡 Pro Tip: Do a dry run—pack, measure, weigh, and price the label before you launch.
📌 Note: I’ll share a deep breakdown of shipping apps (Octolize, Pirate Ship, ShipStation) and when to use flat vs free vs live.
9) Sourcing Raw Materials
Materials shape your margins and your brand. The cheapest inputs can cost you later in returns, bad reviews, or wasted time.
Test broadly, then narrow. Try woods, acrylics, blanks, inks, coatings. Track quality, ship time, cost per unit, and customer response. Keep a shortlist of reliable vendors plus backups.
Buy in bulk carefully. Discounts are great—but overbuying ties up cash and space. Balance savings with flexibility.
📌 A Real Example
I tested a wide range of blanks and materials. Some were excellent but slow to arrive; others shipped fast but had inconsistent quality. Over time I built a vendor list for core products and still experiment for new ideas—in small quantities until demand is proven.
⚠️ Overlooked Costs (Don’t Miss These)
- MOQs (buying more than you need).
- Freight on heavy/oversized items.
- Customs duties/taxes (overseas).
- Storage costs (racks, bins, off-site).
- Waste/scrap and defect rates.
- Poor return policies with bargain vendors.
⚖️ Benefits vs Drawbacks of Sourcing Options
Local Suppliers — fast pickup and better QC; higher prices/limited selection.
Domestic Online — wide choice and fair shipping times; quality may vary; items discontinued.
Overseas (Alibaba/AliExpress) — lowest unit cost and variety; long lead times, customs, inconsistent quality.
Mini-Checklist:
- Test multiple vendors; document results.
- Track all-in costs (shipping, duties, storage).
- Start small; scale only when products prove out.
- Keep backups for critical materials.
- Balance bulk discounts against cash flow and space.
💡 Pro Tip: For bestsellers, keep a small safety stock beyond normal orders so you’re not stuck when a vendor is out.
📌 Note: I’ll publish a vendor resource guide with sources I use and others I’ve vetted—pros/cons to help you start your own list.
10) Building Sample Products

Before you sell your first item, build samples. They are:
- Proof of concept: Real materials beat mockups.
- Marketing assets: Authentic photos/videos convert.
- Cost truth serum: Samples reveal real material, time, and finishing needs.
Samples aren’t wasted effort. They’re an investment in quality and credibility.
📌 A Real Example
To control prototyping costs, I use cheaper bits/materials early (e.g., budget Amazon bits), then switch to premium bits (like BitsBits) once designs are dialed in. With the UV printer and laser, I expect to waste ink and blanks while I learn—that’s part of the process.
I’ve also run into surprises you only find in the sample phase. On a recent product, the glue dried thicker than expected, expanding into fine details and ruining them. The screws that looked perfect on paper turned out too long after sanding and shaping—they poked out the front. Prototyping let me fix these privately instead of disappointing customers.
And seek feedback. Don’t let ego block profit. You might love your design, but if customers consistently say it’s missing something, they won’t buy. You don’t have to implement every suggestion—but evaluate each one. Sometimes it’s a valid improvement; other times it’s a paid add-on or a premium variant.
⚠️ Overlooked Costs (Don’t Miss These)
- Hardware (screws, hinges, hooks) used on failed builds.
- Consumables (glue, sandpaper, finish, tape).
- Tool wear (bits/blades dull during tests).
- Energy costs (long test runs).
- Your time (track it—it’s real cost).
🔄 Customer Feedback Loops
- Friends & family tests with specific questions.
- Beta customers (discount for detailed feedback).
- Social polls (compare design variations).
- Event booths (watch how people interact).
Ask structured questions:
- “What would make this better for you?”
- “Would you pay more for an upgraded version?”
- “Did anything frustrate or confuse you?”
Mini-Checklist:
- Build at least one sample of every product.
- Use lower-cost consumables for early prototypes.
- Track time and materials used.
- Photograph samples for listings.
- Decide how to clear old samples (gifts, discounts, bundles).
- Establish at least one feedback loop.
💡 Pro Tip: Sample photos often become your best listing photos. Make them count.
📌 Note: I’ll publish my prototyping workflow, including consumables for tests vs production—and how to repurpose “failed” samples.
Originality & IP basics (quick reminder): Don’t resell others’ downloadable files as-is. Check license terms, keep proof of purchase, add transformative value (design changes, personalization, bundling), and avoid trademarked designs unless you have permission. This isn’t legal advice—just good practice.
11) Pricing Your Products
Pricing is hard. Many makers underprice to “be competitive,” then wonder why they’re exhausted and broke. Your price must cover everything: materials, overhead, subscriptions, card fees, packaging, marketing, occasional shipping shortfalls, and your time.
If an item earns $0.50 profit after an hour of work, you’re paying yourself less than fast-food wages. That isn’t sustainable. Don’t race to the bottom—compete on value (quality, customization, speed, brand).
📌 A Real Example
I quickly saw how recurring tools add up: design software, graphic libraries, SEO tools, bookkeeping—none tied to a single product, all essential to the business. I totaled monthly/annual overhead and spread it across expected sales so every product contributed to these costs.
I also budget marketing (ads/events/content) into pricing. It’s not extra; it’s how customers find you. And I ask the most important question: am I paying myself? Pricing should fund your future, not just your bills.
⚠️ Overlooked Costs (Don’t Miss These)
- Platform fees (Etsy, Shopify apps, Woo plugins).
- Card fees (e.g., 2.9% + $0.30).
- Marketing (ads, boosted posts, influencers).
- Subscriptions (design, bookkeeping, SEO).
- Utilities/shop space (power, internet, rent/portion of home).
- Your labor (track it and pay for it).
⚖️ Benefits vs Drawbacks of Pricing Approaches
Low-Cost Strategy — easier early sales; razor-thin margins and bargain-hunters.
Value-Based Pricing — higher margins and loyalty; requires strong branding/quality.
🧠 Pricing Psychology: More Than Just Numbers
- Charm pricing ($49.99 vs $50).
- Premium anchoring (list a premium bundle next to standard).
- Bundling (board + knife; tumbler + straw).
- Tiered options (basic/standard/premium—most pick the middle).
- Free-shipping threshold ($75+ nudges bigger carts).
- Round vs. odd pricing (round feels premium; odd feels deal-oriented).
Mini-Checklist:
- Add all expenses to your pricing model (materials, fees, subs, marketing, overhead).
- Allocate subscription costs across monthly sales.
- Pay yourself for labor—on purpose.
- Review pricing quarterly and adjust.
💡 Pro Tip: Nervous about raising prices? Add $1–$2 across several items and track sales. Margins often improve with no impact on volume.
📌 Note: I’ll release a pricing guide with calculators for platform fees, marketing, subscriptions, and target hourly pay.
12) Marketing Your Products

You can have the best product in the world—if no one sees it, it won’t sell. Marketing isn’t optional. It doesn’t require massive budgets, but it does require intention.
Don’t rely on a single channel. Diversify across online/offline, paid/organic. That resilience protects you from algorithm changes or event seasonality.
📌 A Real Example
I treat marketing as a line item in pricing (ads, events, content). My stack: build the website first (control), then Etsy (visibility), and social (community).
I also use multiple social platforms—and separate accounts within them—to widen reach: some accounts are product-focused, others share behind-the-scenes or reviews/tools. All paths lead back to my store and services. Different audiences, same destination.
📣 Marketing Methods
- SEO: optimize listings, product pages, and images for search.
- Paid Ads: Google Ads, Facebook/Instagram, promoted Etsy listings.
- Social: Instagram (brand), Pinterest (evergreen ideas), YouTube (tutorials), TikTok (awareness).
- Events: craft fairs/markets to meet customers, test products, and collect emails.
- Word of mouth: encourage reviews, UGC photos, and referrals.
🔄 Social Media Funnels
Guide people from awareness → engagement → purchase:
- Awareness: short-form video/reels or Pinterest inspo.
- Engagement: YouTube tutorials, IG carousels, blogs.
- Purchase: product links, Etsy promos, site-exclusive offers.
⚠️ Overlooked Costs (Don’t Miss These)
- Ad spend creep (monitor or it balloons).
- Boosted posts that quietly pile up.
- Content time (shooting, editing, posting).
- Event costs (booth, signage, travel, time away from production).
- Promo collateral (cards, flyers, banners, samples).
⚖️ Benefits vs Drawbacks by Channel
Paid Ads — instant traffic; must track ROI carefully.
Organic (SEO/social/YouTube) — durable presence; slow to build; needs consistency.
Events — trust and feedback; time-intensive and local.
Mini-Checklist:
- Budget marketing into pricing.
- Start with 2–3 channels; do them well.
- Learn basic SEO.
- Track ad ROI monthly.
- Collect emails everywhere.
- Use events to test and learn.
💡 Pro Tip: Tell stories, don’t just “sell.” The why behind your products builds loyalty.
📌 Note: A dedicated marketing guide is coming—ads, SEO, content calendars, and social growth without burnout.
13) Helpful Business Tools
Tools can save hours, prevent errors, and scale your work. The wrong mix (or too many) drains profit. Think of tools as silent team members: bookkeeping keeps money straight; design tools bring ideas to life; shipping apps automate drudgery.
📌 A Real Example
- CNC: VCarve Pro (one-time).
- Laser: LightBurn (popular, well-documented).
- Shipping: Octolize Flexible Shipping for rule-based rates.
- Bookkeeping: Wave (free)—I start with free/basic versions and let tools earn their way into paid plans if they truly save time or money.
- Marketing: multiple social accounts with specific roles that all funnel to the store.
🛠️ Categories of Tools to Consider
- Design & Production: LightBurn, VCarve, Illustrator, CorelDRAW.
- Bookkeeping & Finance: Wave, QuickBooks, FreshBooks, Excel templates.
- E-commerce & Marketing: Shopify apps, Woo plugins, Etsy integrations.
- Shipping & Logistics: Octolize, Pirate Ship, ShipStation.
- Content Creation: Canva Pro, Adobe CC, CapCut; Buffer/Later for scheduling.
- Community & Learning: YouTube, Facebook Groups, Reddit, meetups.
🌐 Community Tools & Networking
Not every “tool” is software. Local maker groups, SCORE (free mentoring), SBA workshops, trade associations, and online communities can save you from expensive mistakes—and even unlock partnerships or bulk-buy opportunities.
⚠️ Overlooked Costs (Don’t Miss These)
- Subscription creep ($10–$20/mo adds up).
- Redundant features across multiple apps.
- Free tiers with tight caps.
- Licensing (fonts, images, music) for commercial use.
- Learning curve time.
⚖️ Benefits vs Drawbacks of Tool Options
Free/Open-Source — great for testing; limited support/features.
Paid/Pro — robust + support; ongoing cost/lock-in risk.
Outsourcing — instant results; expensive long-term and less control.
💡 Pro Tip: Let tools earn their place. Start free; upgrade only when the tool clearly saves time/money.
Mini-Checklist:
- Pick your 2–3 must-have tools (design, bookkeeping, shipping).
- Audit subscriptions quarterly.
- Participate in at least one community for support.
- Document how tools fit your workflow (future training).
📌 Note: I’ll publish a resource page comparing popular tools side-by-side.
14) Insurance Considerations
Insurance isn’t thrilling—but it can save your business. Risks vary by setup and product. Online-only sellers differ from event vendors; children’s items differ from décor.
🛡️ Types of Insurance to Consider (what they really mean)
General Liability
Your booth at a craft fair looks great—until someone trips over an extension cord and gets hurt. GL covers injuries/property damage claims. Many events require a GL certificate before you can set up.
Product Liability
A customer claims your tumbler’s seal failed and caused a burn. Even if you did nothing wrong, defending yourself costs money. Product liability covers legal defense and settlements—critical for anything used by kids, in kitchens, or near power/electronics.
Property (Business Personal Property)
A small fire or theft wipes out your CNC, laser, and inventory. Homeowner’s policies usually exclude business equipment. Property insurance replaces gear/materials so one disaster doesn’t end your shop.
Cyber Liability
Your store gets hacked; customer data is compromised. Cyber policies cover investigations, notifications, and some regulatory exposure. Small shops get targeted precisely because security is lighter.
Health & Disability
If you’re self-employed, you are the business. Health insurance protects your personal finances; disability replaces some income if you can’t work.
⚠️ Reminder: I’m not an insurance advisor. The following is a framework—questions and scenarios to explore with a qualified provider, not prescriptions.
❓ Questions to Ask Providers
- What’s excluded? (Exclusions matter as much as coverage.)
- Is product liability included or an add-on?
- Am I covered at events and online?
- Replacement cost or depreciated value on equipment?
- Deductibles—per incident or annual?
- Do retailers or events need proof of insurance?
⚠️ Real-World Scenarios
- Fire in the garage destroys your machines—property coverage saves the business.
- Trip/fall at your booth—GL covers medical/legal costs.
- Injury claim from your product—product liability funds the defense.
- Store breach—cyber liability covers the response.
⚠️ Overlooked Costs
- Event coverage riders (often required).
- Home policies excluding business use.
- Low premiums hiding high deductibles.
- Specialty riders for unique gear/products.
Mini-Checklist:
- List your risks (products, events, online).
- Ask about exclusions, deductibles, and event coverage.
- Confirm product liability is included or add it.
- Keep certificates ready for events/wholesale.
- Reassess annually as you grow.
💡 Pro Tip: Don’t assume homeowner’s/renter’s insurance covers business gear. Ask for business-specific coverage.
📌 Note: I’ll compare common small-shop policies, typical costs, and how to shop around without overpaying.
15) Scaling Your Business

Scaling is exciting—and risky. Growth doesn’t equal profit. Each step adds cost and complexity. Scale intentionally.
📌 A Real Example
I scaled early with multiple machines (CNC, laser, UV). Advantage: flexibility and less outsourcing. Trade-offs: higher upfront investment, more maintenance, and more to learn. For many shops, mastering one machine then expanding later is smarter. Align growth with your strategy and resources.
🚀 Scaling Paths: Options & Trade-Offs
1) Upgrade Equipment — faster/higher quality; expensive and requires install/training.
2) Add Equipment — more capacity/diversification; needs space, power, software, workflow changes.
3) Outsource Work — scale fast without capital; higher per-unit cost and less control; recurring cost even in slow periods.
4) Hire Staff — free up founder time/add skills; payroll/management/legal responsibilities.
💡 Hiring Reminder: It’s your job to set clear expectations. Adding tasks later? Be fair with compensation. Don’t expect startup-level sacrifice from employees without an ownership stake.
⚠️ Scaling Too Soon
- Buy a bigger machine before demand is steady → debt + idle capacity.
- Outsource without steady orders → paying for unused capacity.
- Hire before the pipeline is predictable → payroll strain.
👉 Rule of thumb: Prove demand; consistently max out your current setup before expanding.
🧮 Decision-Making Guide
- Is your bottleneck time, equipment, or skill?
- Will this move improve profit, not just capacity?
- Can cash flow cover it if sales dip?
- Are you ready to manage more people/process/maintenance?
Mini-Checklist:
- Identify bottleneck and quantify it.
- Compare options with realistic costs/benefits.
- Validate demand (preorders, waitlist, repeated sell-outs).
- Make a downtime plan.
- Revisit pricing to cover new costs.
💡 Pro Tip: Scaling isn’t always “bigger.” Sometimes the best move is process refinement, raising prices, or narrowing focus.
📌 Note: A deeper scaling guide is coming: outsourcing playbooks, hiring timelines, and ROI calculators for big upgrades.
16) Pulling It All Together
To help you put all of these steps into action, we created a [complete printable checklist] you can download and use as your roadmap

You’ve walked the full lifecycle: schedule, formation, banking, equipment, online presence, payments, shipping, sourcing, samples, pricing, marketing, tools, insurance, and scaling.
The path isn’t identical for everyone. Some parts are fun; some are frustrating. Each choice—bank, processor, machine, platform, pricing—shapes the business you’re building.
💡 The Core Pillars
- Plan with Intention — tie every decision to your long-term vision.
- Keep Finances Clean — separate money, watch fees, price to reality.
- Build Before You Sell — prototype, test, and invite feedback.
- Market with Strategy — own your site, use marketplaces wisely, build funnels.
- Protect Your Business — insurance, backups, and documented processes.
- Scale Responsibly — prove demand; add capacity with confidence.
🔑 Final Thought
Build a business you’re proud of—one that reflects your skills, story, and vision. There will be mistakes. Learn, adapt, and keep shipping.
⚠️ Disclaimer
This guide is based on my own experiences and research in building a digital manufacturing business. It is not legal, tax, or financial advice. Every business is unique, and laws, regulations, and requirements vary by state, country, and industry.
Use this as a framework for consideration, but always do your own due diligence. Consult qualified professionals when making decisions about business formation, taxes, insurance, and compliance. Make sure you are following all applicable laws and ordinances for your location and business model.
[…] 👉 If you’re just starting out in digital manufacturing, you may also want to read: The Ultimate Guide to Starting and Growing a Digital Manufacturing Business. […]
[…] If you’re still early in your journey, this is one of those topics that’s worth understanding before you invest more time or money. The Ultimate Guide to Starting and Growing a Digital Manufacturing Business […]