
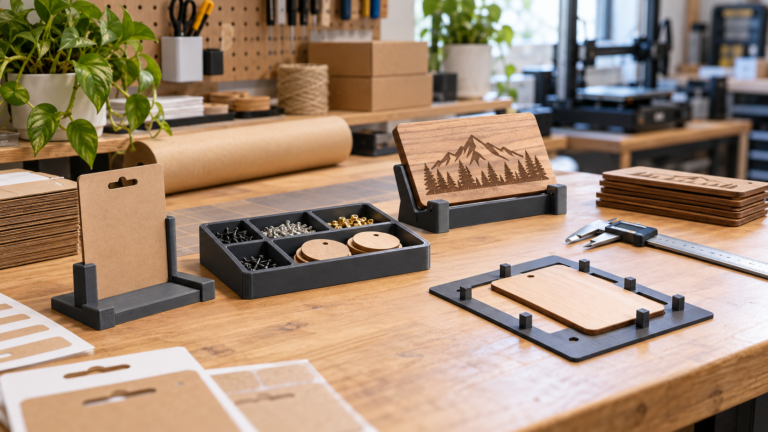
The 3D print that saves your shop the most frustration might be something no customer ever sees. A small guide keeps labels straight. A shallow tray stops hardware from rolling under the bench. A plain support holds every product sample at the same angle for photos.
None of these are exciting prints, and that’s partly why they’re useful. They fix a small problem that keeps coming back.
Start there: one repeated task, one specific aid, and one way to tell whether it helped. You don’t need to invent a product line or buy a printer for a list of projects you might get to someday. If you want to prove the idea first, a local printing service can make a trial part.
Keep the first experiment low-risk and on the bench. Stay away from cutting tools, heat, electrical systems, and machine guards, or anywhere else a failed print could hurt someone.
Find the repeated nuisance before choosing a model
Watch a normal batch go through your shop. Where do you keep reaching for a ruler? Which small parts keep getting mixed together? What are you propping up with an offcut because it won’t sit where you need it?
Write down the task before you go looking for a model. “Hold this backing card in the same position while I apply its label” gives you something concrete to solve. “Print some organizers” can easily eat an afternoon improving a drawer that was never slowing you down.
A good brief names the object, the surface it touches, which way it needs to face, and what a good result looks like. Don’t skip the awkward details. Maybe there’s a rounded corner or a protective sleeve, the card bows slightly, or your fingers need room to lift the finished piece out.
Pick a job you’ll repeat soon. If tape marks, a store-bought bin, or a scrap of material would solve it just as well, go with the easier answer. Printing isn’t automatically the better option.
Four shop prints worth testing
A label-positioning guide for a repeat package or backing card
A shallow corner guide can locate a card or flat package while leaving the label area open. Instead of measuring the same offset over and over, you push the item into the guide and the label goes on in the same spot every time.
Make the reference edge obvious. Give it enough clearance that slightly different cards won’t jam, and leave a finger notch so pulling the card out doesn’t bend it. Check that the underside and edges are smooth enough that they won’t mark the surface.
Test the guide with the actual item, not just the dimensions from a listing. A guide built around an empty box can behave differently once the box is full. And if the package can sit in it backward, someone will eventually put it in backward, so change the shape or add a clear orientation mark.
Keep in mind that this fixes placement. It won’t catch a wrong order: a perfectly straight label can still belong to the wrong customer. The identity checks in your custom-product packaging workflow stay separate from the guide.
An assembly tray that shows what is missing
For products assembled with small fittings, a tray with distinct pockets makes missing parts easier to spot. What matters isn’t how many compartments it has. It’s that the tray mirrors one complete assembly.
Say you make an ornament that needs a cord, a bead, and a backing card. Give each component its own place in the tray and you can stage a small batch without loose pieces drifting into finished work. Label the pockets in plain language, and make sure they’re easy to empty and wipe out.
Keep unverified parts away from accepted ones. A tidy pocket can make a questionable item look approved when it hasn’t been. If you already use an order sheet, hang on to it. Physical organization doesn’t replace the approval and quantity controls in batching personalized orders.
When every pocket can be the same size, a store-bought divided tray is usually enough. Printing earns the extra effort when custom pocket shapes prevent a mix-up, or when a standard tray wastes bench space you can’t spare.
A stand for repeatable product photos or sample displays
A low-profile support can hold a small sign, card, or plaque at a consistent angle. That’s handy when you’re photographing several variants and want the differences to show up in the products, not in how each one leans.
Give it a broad, stable base and test it with the real item on the real surface. Bump the table and see what happens. A light support that’s fine with a paper sample may tip once an acrylic plaque is sitting on it. For a casual shop print, skip tall, heavily loaded, or overhead setups.
Pay attention to contact surfaces. Rough edges can scratch a finished piece, and padding or adhesive can leave marks. Try the support with a reject or spare sample before you trust a paid product to it.
The support is only one small piece of a repeatable product photography setup. Keep it out of the shot when you can. When you can’t, make it clear it’s a photo prop and doesn’t ship with the order.
A bench-only spacing or orientation template
A simple template can show where an embellishment goes, or help you check that a component faces the right way before hand assembly. It’s especially useful when the finished design has a clear visual reference that’s tedious to measure every time.
Reference the edge that matters on the finished product. If your blanks vary in width, centering from one side may not give you the result you want. Try the template on several blanks instead of assuming one sample speaks for the whole batch.
Treat a printed template as a practical aid. It isn’t a calibrated measuring instrument. For dimensions that decide fit, contractual acceptance, or safety, use proper measuring tools. A snug-looking fit doesn’t prove the print is accurate.
Keep this first template on the bench. A locating guide you use during manual assembly is a very different engineering problem from a fixture that has to hold a part while a router cuts it.
Choose material for the job, not just what’s loaded
For an ordinary room-temperature tray or a lightly handled prototype, a familiar filament is often a sensible place to start. That doesn’t mean the same print belongs in a hot vehicle, next to a heater, under constant load, or anywhere near cleaning chemicals.
Check the filament maker’s guidance for the exact material you’re using. PLA, PETG, and other names describe broad families; they don’t promise that every formulation behaves the same. How the finished part holds up also depends on printer settings, geometry, layer bonding, and print orientation. Prusa’s filament material guide is a useful starting reference for comparing requirements, though it won’t certify your finished tool.
Before you reach for thicker walls or more infill, think about how the part could fail. A guide that slowly bends can cause more trouble than one that snaps, because it may shift every label without anyone noticing. Check the contact edges and key dimensions after the tool has seen real use, not just when it comes off the printer.
If heat resistance, solvent resistance, hygiene, or structural strength really matters for the job, it’s no longer a casual print. Get proper material and application advice, or buy a purpose-made tool.
Keep casual prints out of machine-critical jobs
The word “jig” covers a lot of ground. A hand-labeling guide and a CNC workholding fixture carry very different levels of risk, and they aren’t interchangeable projects.
A generic downloaded print is never a substitute for a machine guard or interlock. The same goes for extraction safety components, electrical enclosures, lifting points, and rated clamps. Keep printed bench aids away from moving machinery unless the application has been properly designed and validated for that environment.
For laser work, don’t assume a filament is safe in the beam just because it prints well. Unknown plastics and additives bring fire and fume risks. Follow the machine manufacturer’s approved material and fixture guidance, and use the separate laser safety and ventilation guide when you plan the workspace.
UV printers come with their own clearance and contamination issues. A holder that looks low enough can still cause a printhead collision. A general bench-tool article like this one can’t tell you what’s safe for bed fixtures, ink compatibility, or cleaning on your particular printer.
Leave food-contact, child-safety, and medical uses out of this first shop-utility experiment too. A filament’s description doesn’t prove a finished printed object is suitable for any of them.
Test one tool before printing a drawer full
Print the smallest version that can answer the question. A label guide might only need a corner and an alignment edge, not a full tray. Check the fit, knock off rough edges, and try it on spare samples before it goes anywhere near a customer order.
Run a normal batch with the tool and one without. Time the whole cycle: placing the item, using the guide, lifting it out, inspecting it, and clearing the station. A tool that speeds up placement but makes removal awkward may just move the delay somewhere else.
Jot the result down in a short note. Which task did you test? What material and design version? What went wrong, and did you keep the tool? Track misplacements and rework alongside time. And use representative items, including the slightly awkward ones, so you’re not only testing with perfect blanks.
Count design time, failed prints, cleanup, and replacement effort when you decide. Filament cost on its own tells you very little about whether a tool was worth making. If you ever sell the tool, the product pricing calculator can help you catch the costs a quick material estimate misses.
Saved time only matters if you can use it. The tool should cut labor, prevent mistakes, free up a bottleneck, or open up capacity for work you can actually sell.
Make a useful tool easy to reproduce
Once a tool proves itself, mark it with the task and version number. Keep the editable design, the export file, the print settings, and a note about which blank or package it fits all in one place. That way, when a supplier changes the card size, you’ll know which guide needs checking without measuring everything in the drawer.
Look it over whenever the task changes, and every so often while it’s in use. Retire parts that are cracked, warped, sharp, or worn out. Don’t hang on to them just because reprinting is a hassle. Keep the tool near the job it supports, not in a drawer of prints you’re proud of.
If someone else is going to use it, hand it over without much explanation and watch. A good guide makes the correct orientation obvious. If you have to stand next to it and narrate every move, the design isn’t finished.
Should you sell the tool after it works in your shop?
Maybe, but being useful in your shop isn’t the same as having a product spec. Another shop may use different blanks, different adhesives, or a different order of operations. Describe the exact dimensions and what it’s meant for instead of calling it universal.
If you started from someone else’s model, read the actual license before you sell printed copies or modified versions. A free download doesn’t automatically come with commercial rights. Laticy’s guide to buying design files and selling what you make covers that decision in more detail.
One guide that works is plenty. If it saves you a repeated measurement and makes the bench easier to use, it’s done its job. Not every shop improvement needs to become something for sale.
FAQ
What are good first 3D printed shop tools?
Start with low-risk tasks that stay on the bench, like a label-positioning guide, a parts tray, a small sample stand, or a manual assembly template. Pick something that annoys you every batch, then ask honestly whether a store-bought or improvised fix would do the job just as well.
Do I need to buy a 3D printer to make shop tools?
No. A local print service or a shared makerspace can make a trial part for you. Just confirm the design rights, material, dimensions, and what it’s for. Proving one tool helps is a smarter first step than buying a printer for projects you haven’t defined yet.
Is PETG always better than PLA for a shop tool?
Not always. It depends on the temperature the tool will see, the load on it, what it touches, any chemicals involved, and the print design itself. Check the guidance for the exact filament you’re using and test it in the real application. A filament name isn’t a strength or safety rating.
Can I use these prints as CNC clamps or laser fixtures?
Not based on anything in this article. Machine workholding, laser exposure, and printer-bed fixtures need application-specific design and the manufacturer’s guidance. Everything here is a bench aid, not a validated machine component.